Give your people a proper Windows workspace, wherever they work. Bring cloud PCs, access and everyday administration together — without becoming an IT expert.
For a small business, the useful starting point is a recurring role. In fictional Harbour Operations, Sam keeps quotation, costing and proposal tools together, while Jules works in a separate development environment with a chosen editor, Git, runtime and repository. The business installs and licenses those applications and confirms the real workflow before expanding.
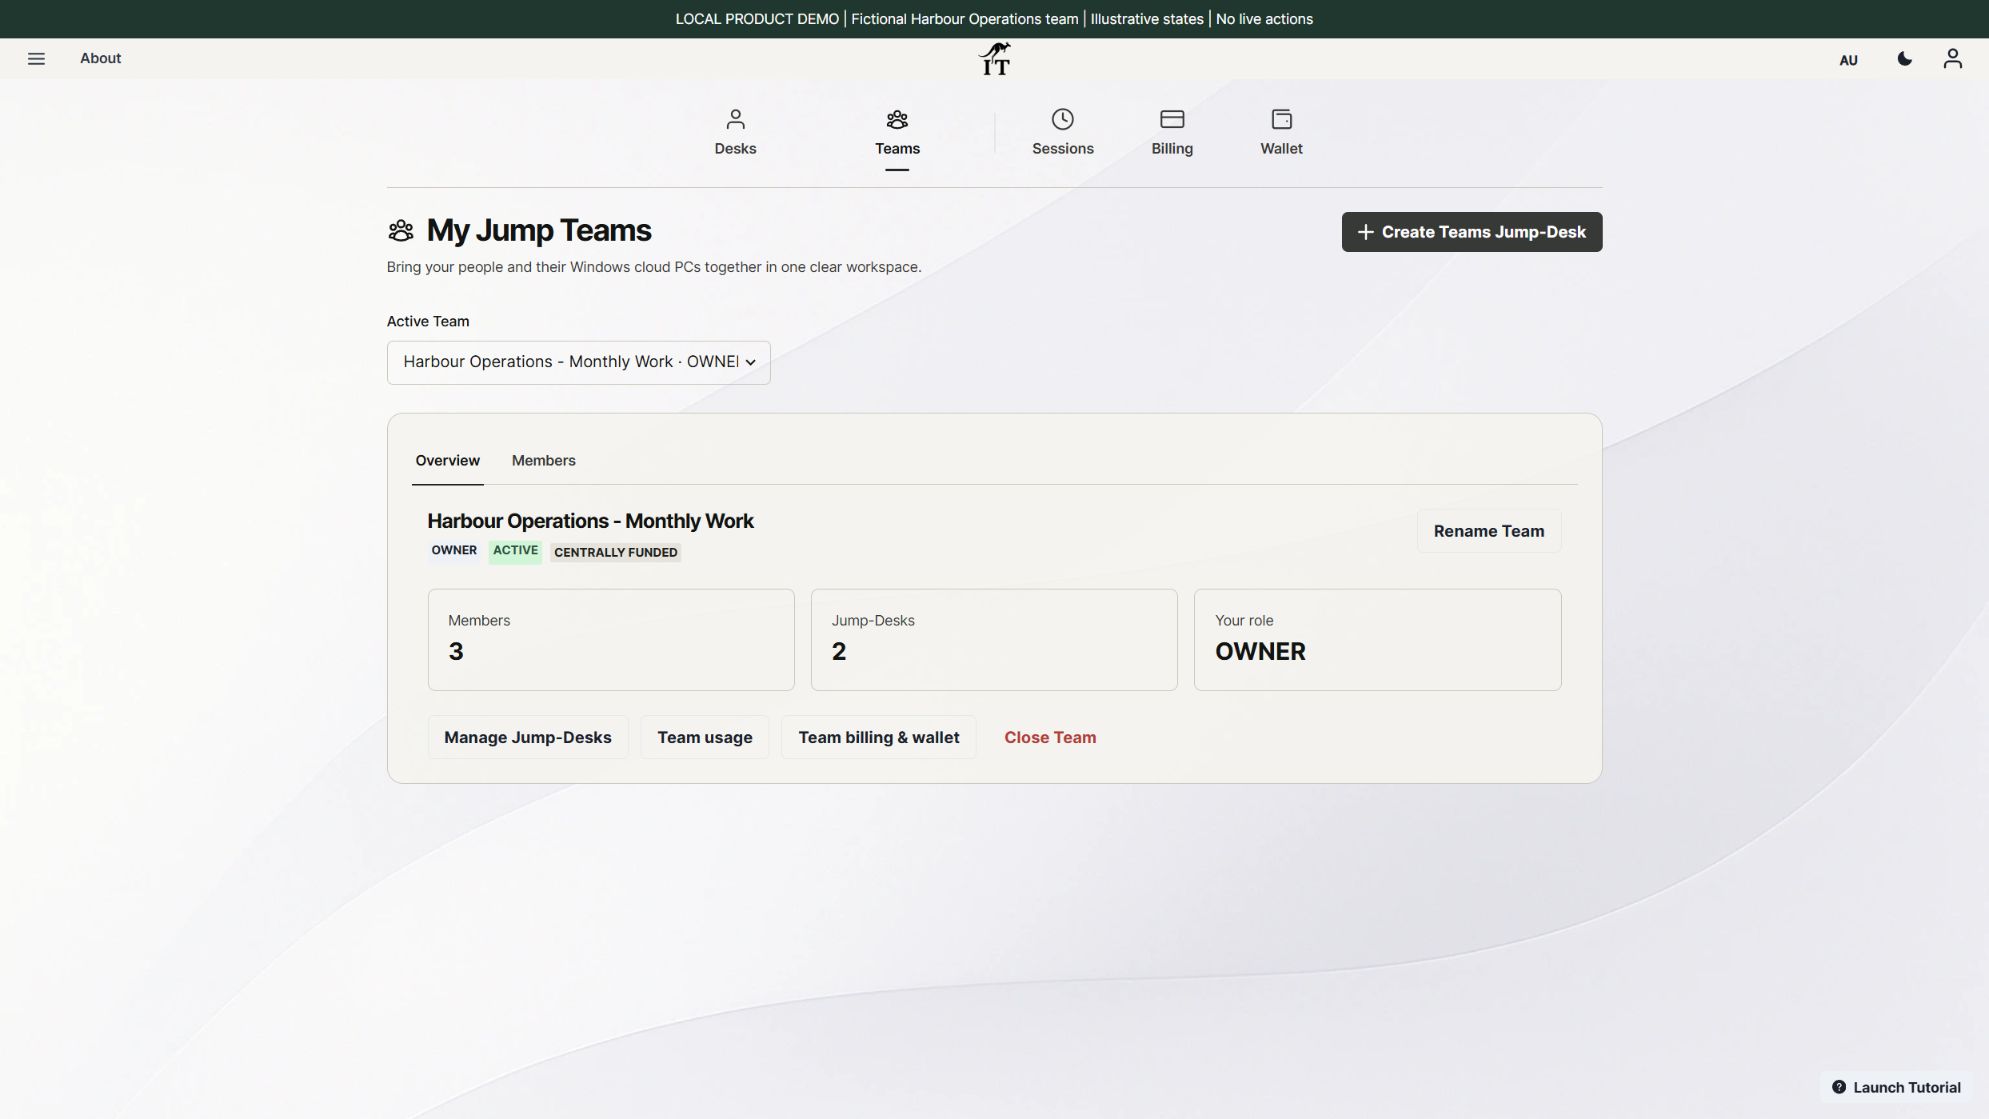
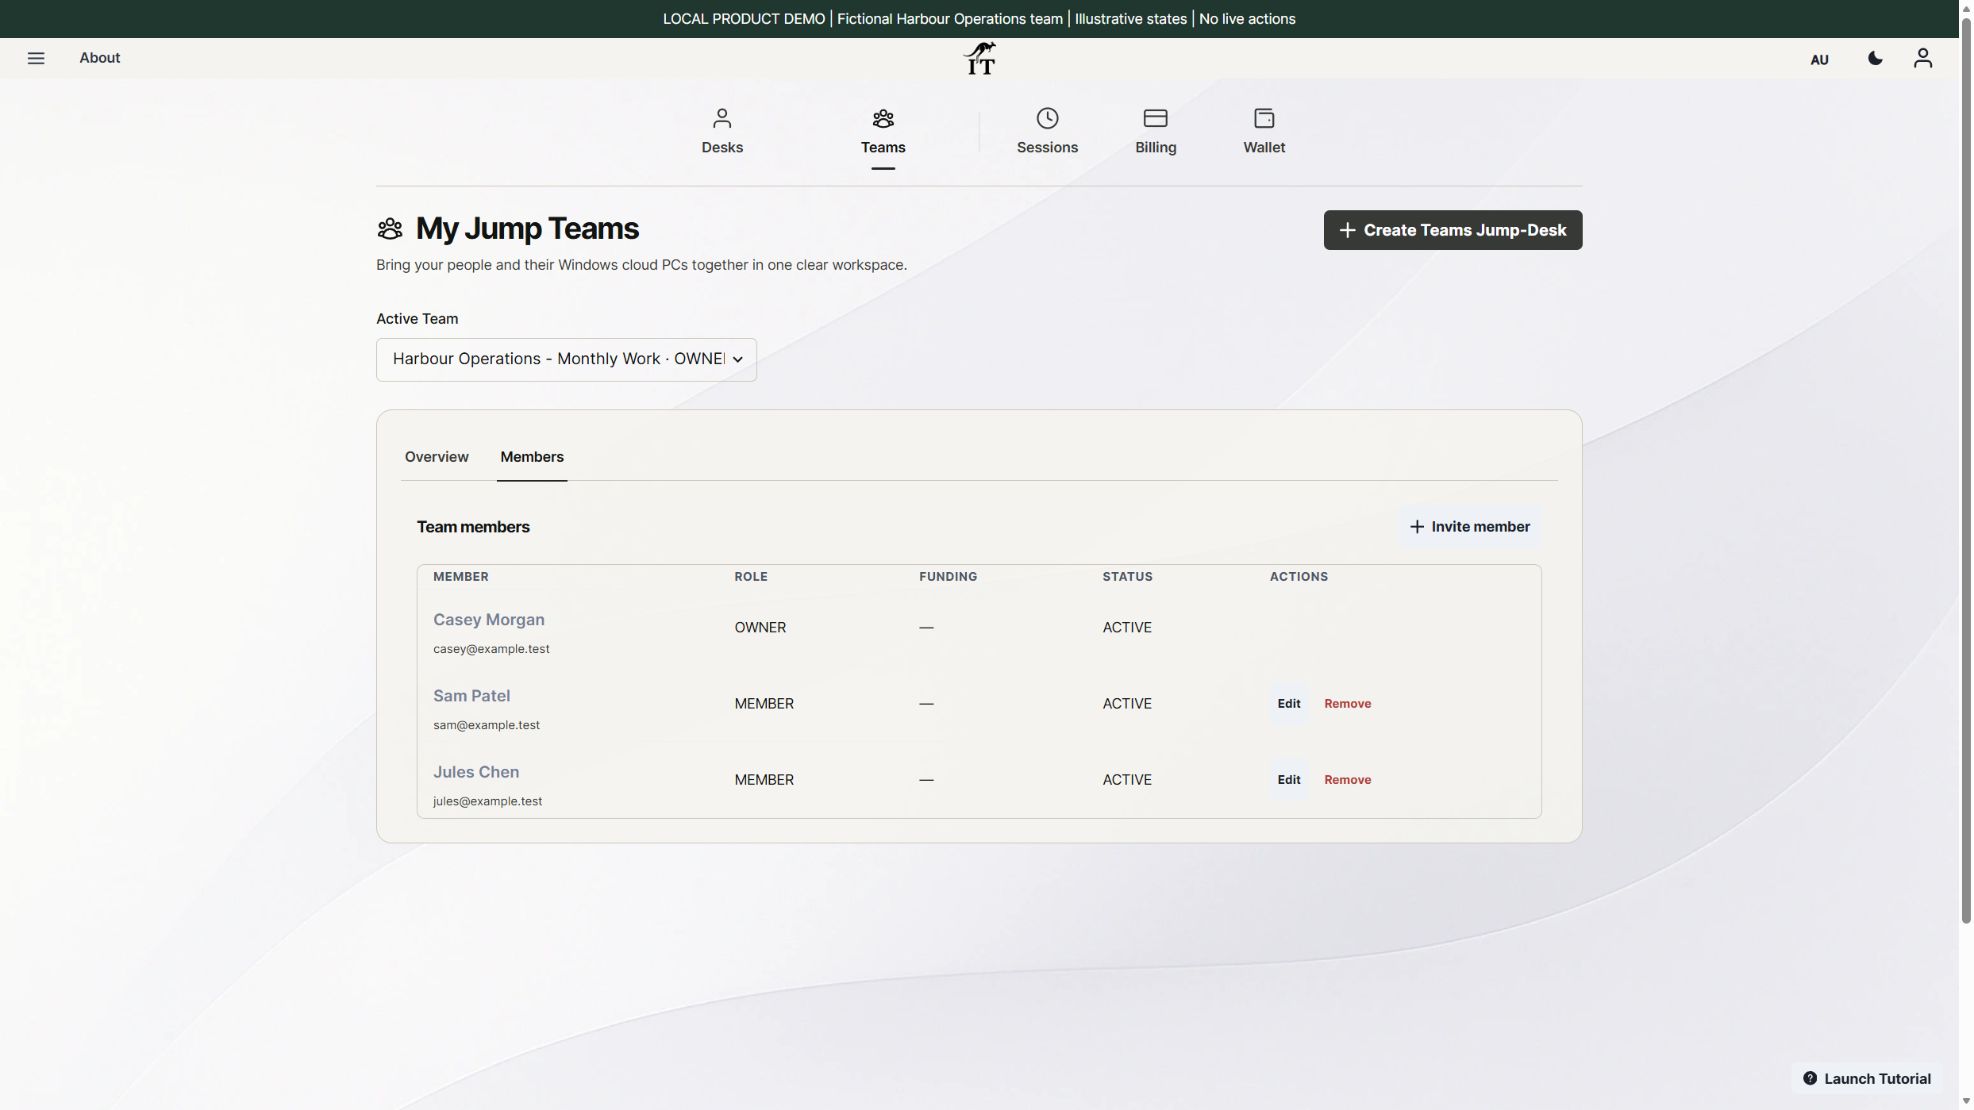
Fresh actual-product demonstration, 17 October 2026. Harbour Operations and its people are fictional; these are illustrative states, not a customer deployment. Select to enlarge.
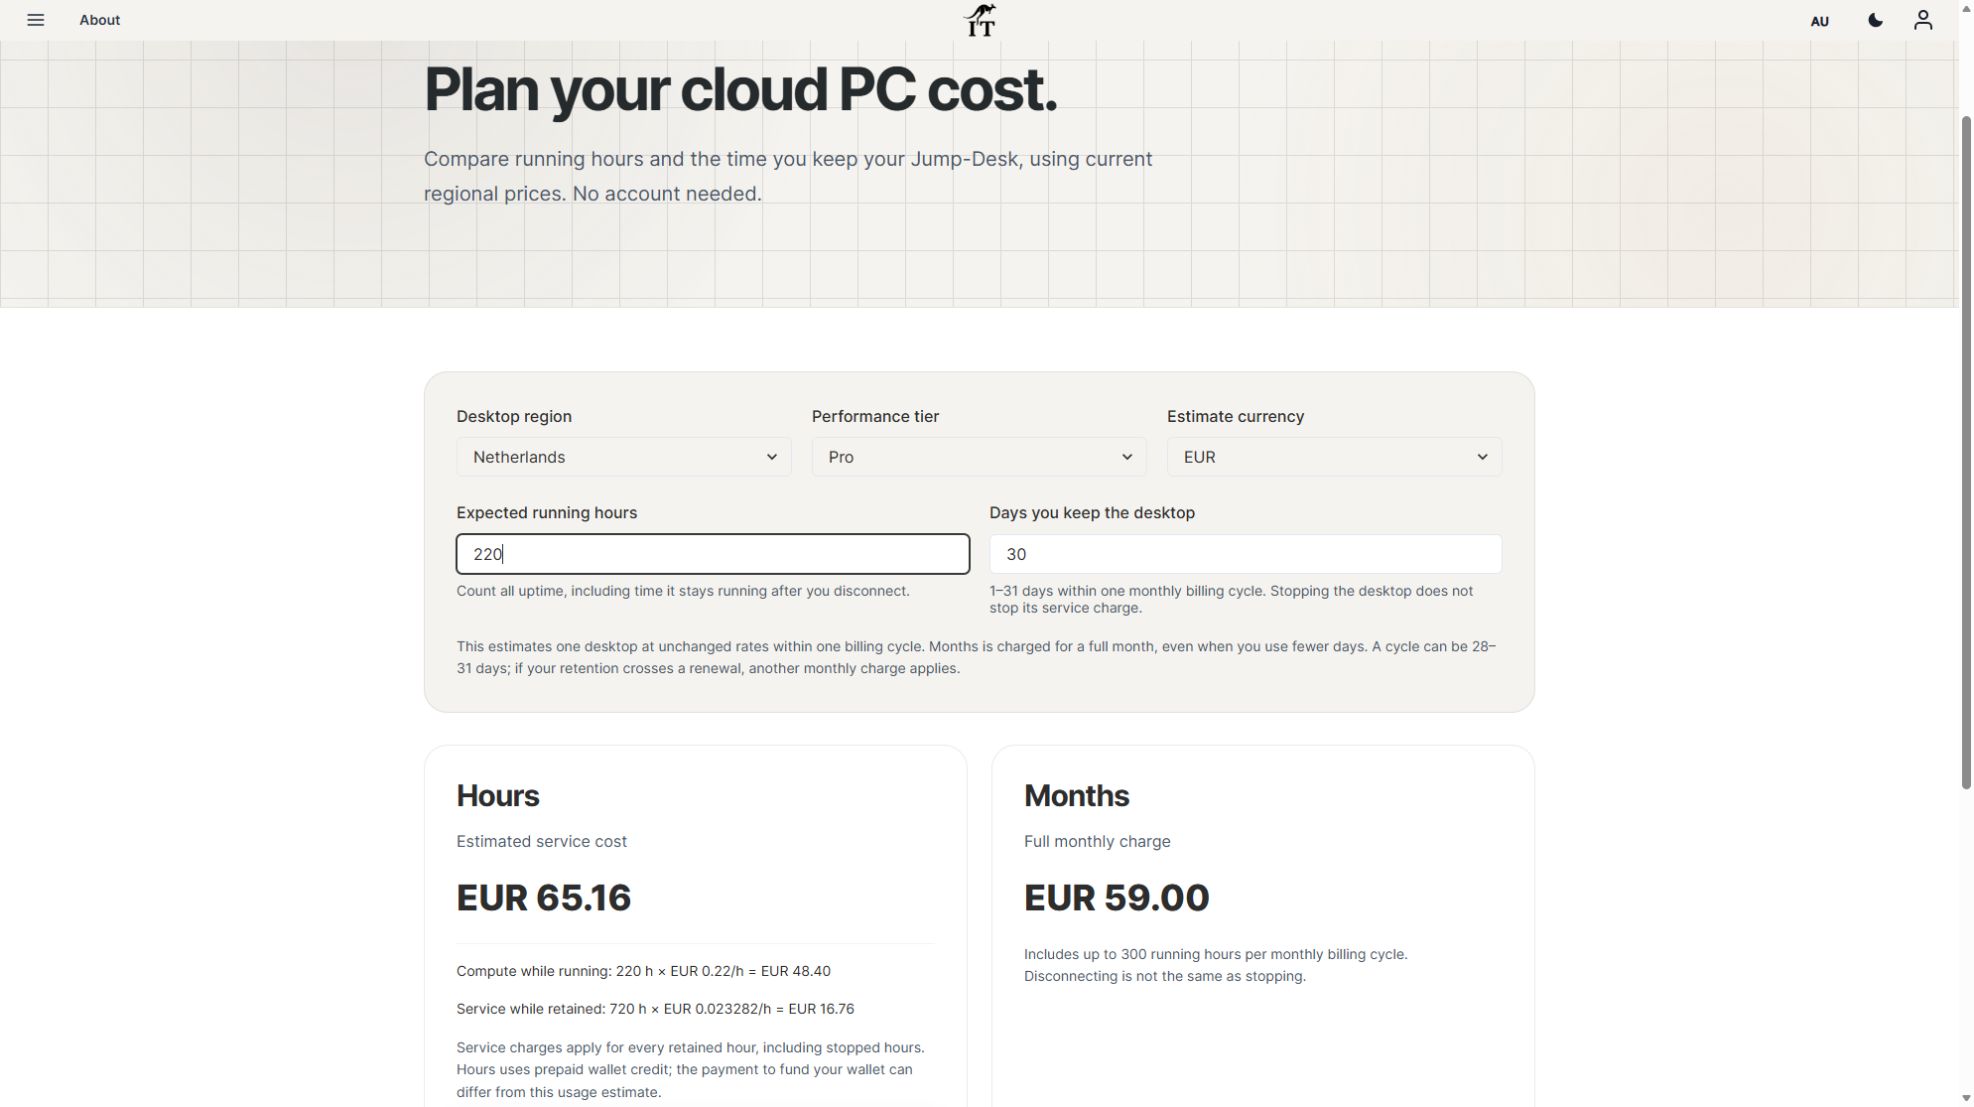
Choose Months when a role needs the environment repeatedly across the billing period and the complete cost makes sense. Months is the full monthly price with up to 300 uptime hours per desktop; it is not prorated to a few working days or a pooled Team allowance. Hours combines running compute with retained service charges, including when stopped. Monthly subscriptions and eligible Hours prepaid funding remain separate.
Use one desktop for each simultaneous Windows user. Assign Team roles, Windows Standard or Administrator access, application permissions and billing responsibilities deliberately. A member count is not a count of paid desktops, and assigning a desktop is not the same as granting every application permission.
Jump-Teams adds shared administration to Jump-Desk Windows 11 Pro cloud PCs. A business owner can create a Team, invite colleagues, assign desktops and delegate selected permissions. Choose a suitable plan and region for each desktop, then configure each person’s separate Windows access.
From invitation to the first working session.
Create the Team
Name it and confirm the currency.
Invite your people
Choose each colleague’s role and additional permissions.
Assign the workspace
Choose a Jump-Desk plan, region and performance for the work.
Set up Windows access
Configure the login and test the member’s connection.
YOUR NEXT STEP
People, desktops and responsibilities in one place.
Invite colleagues as Admin or Member, assign desktops and review the permissions needed for their work. Team roles, Windows access and funding permissions are separate decisions for the owner.
Jump-Teams overview with team selection, member count and desktop count. Product capture with demonstration data. Select to enlarge.
01 / JUMP-TEAMS
More room for the work. Less time coordinating the tools.
The next hire needs a Windows application. A contractor joins for a project. Your operations colleague works from another city. Jump-Teams gives these requirements one place in the product, with people and their assigned cloud PCs visible together.
Start with the team you have today. Choose a desktop configuration that matches the role, test the required application and add the next workspace when the work calls for it.
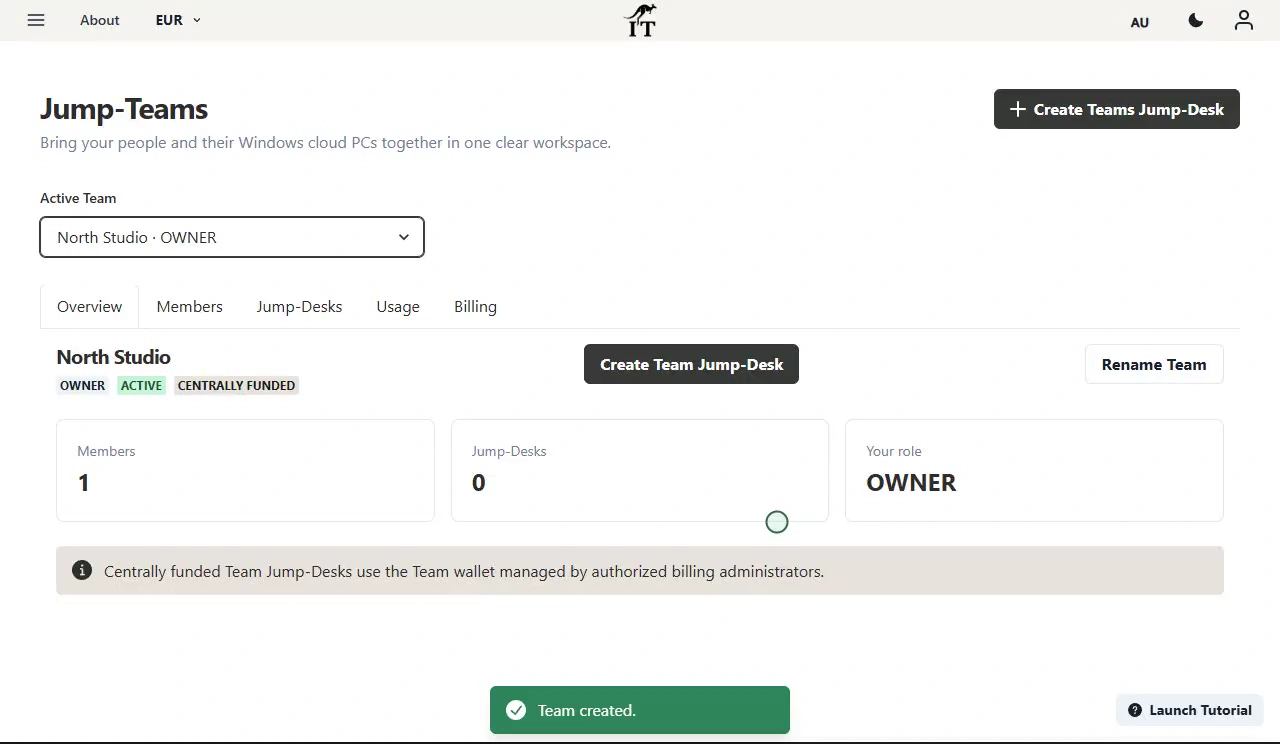
Jump-Teams overview for the fictional North Studio team, with members, desktops and the Owner role. Demonstration data.
02 / JUMP-TEAMS
A working arrangement owners can understand.
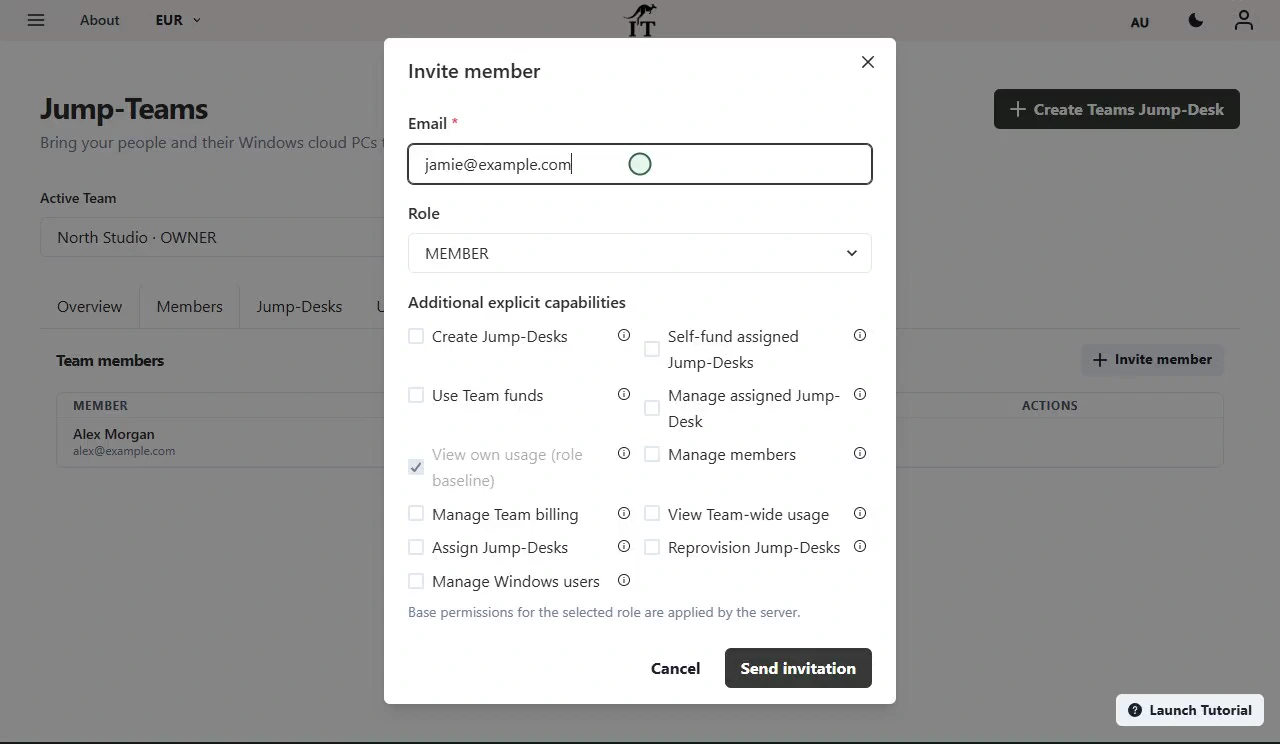
The person who creates the Team is its Owner. Invite colleagues as Admins or Members, then choose additional permissions for the tasks they need to perform. An appropriate colleague can help with administration without every team member receiving the same controls.
Keep billing access deliberate. Team roles govern what someone can do in Jump-IT; Windows login access is configured separately. Your application accounts and licences also remain part of the setup.
Jump-Teams invitation dialog with Member and Admin roles and additional permissions. Demonstration data.
03 / JUMP-TEAMS
Months for the core team.
For regular work, start by assessing Months. Each monthly desktop includes up to 300 hours of uptime and uses subscription checkout. The retained workspace keeps compatible apps, settings and working files between sessions.
Compare that uptime allowance with the real working pattern. A session that has been disconnected can leave the desktop running, so make checking usage and desktop state part of the routine.
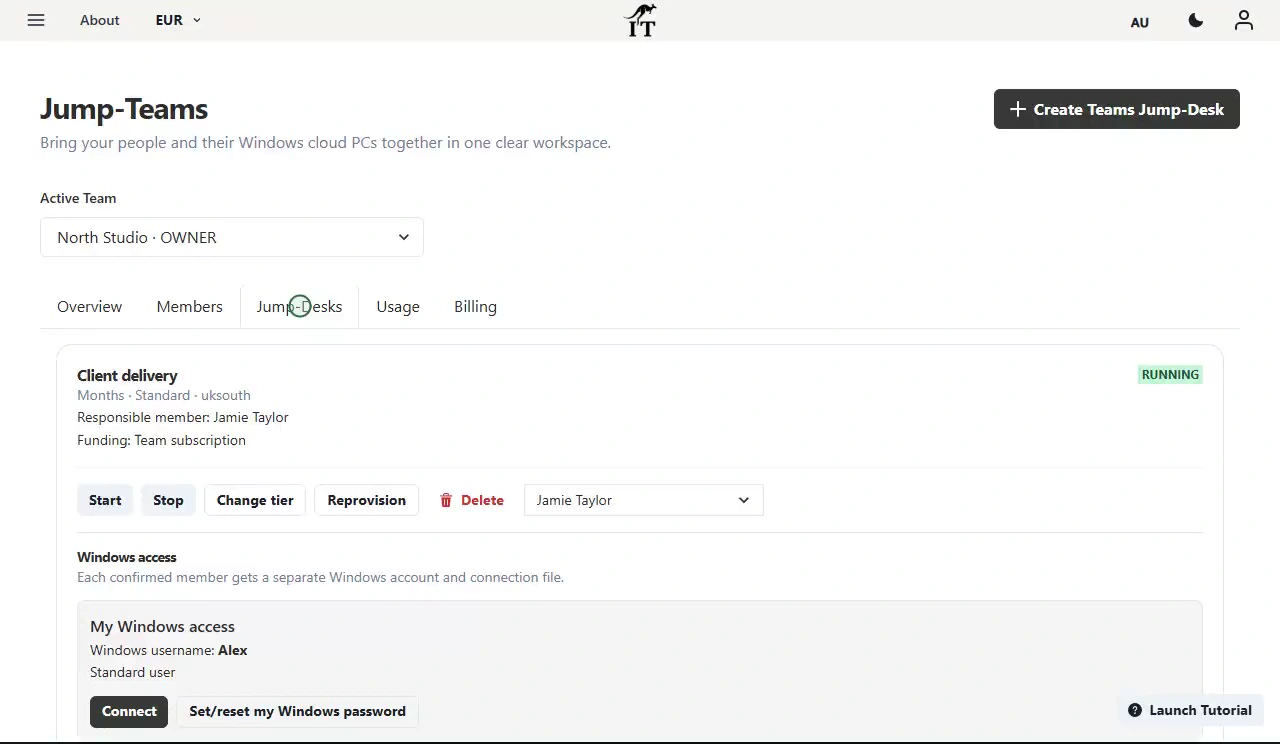
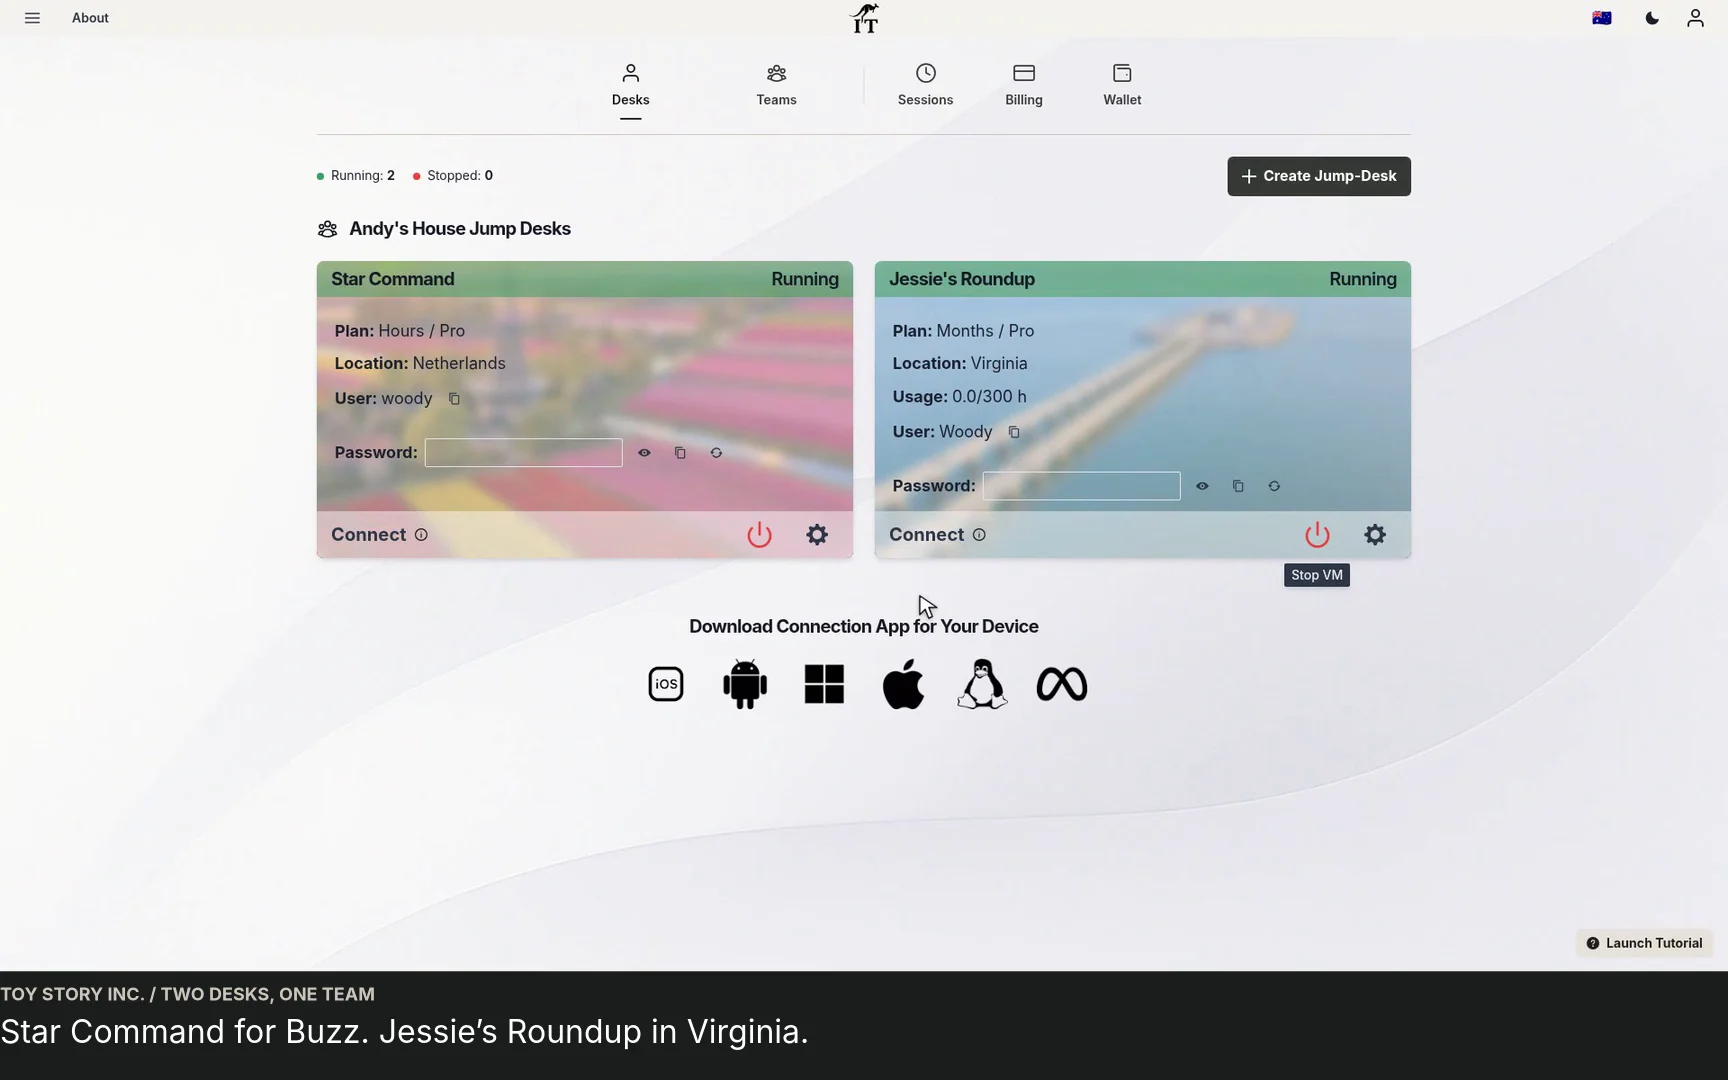
The Jump-Teams Desktops view, showing assigned Windows workspaces and management actions. Demonstration data.
04 / JUMP-TEAMS
Hours for occasional work.
An intermittent development task, a short freelance project or a clean Windows test environment can suit eligible prepaid Hours desktops. Review central Team funding or member self-funding where offered. Personal self-funding requires the member’s explicit approval.
Hours compute is charged while running. A separate service charge continues while the desktop is retained, including when compute is stopped. Review both parts of the cost before choosing it.
05 / JUMP-TEAMS
Designed for the moments a small business knows.
A new starter: invite the colleague, choose their permissions and assign a suitable desktop. A growing operation: share the permitted administration with a trusted colleague. A distributed team: choose an available region around the person and workload.
A project ending: save required files, review Windows access and Team membership, then decide what happens to the desktop and its billing. Each is a separate decision, so a clean handover needs all of them.
Illustrative workspace.
06 / JUMP-TEAMS
Make the first workspace a useful pilot.
Choose one real role and a representative application. Test the supported device, network, sign-in and file workflow. Record what worked before extending the arrangement to other staff.
Jump-Teams offers the administration shown here. If your organisation needs centrally enforced device policies, custom images, single sign-on integrations or specialist compliance controls, assess those requirements explicitly before adopting any service.
INSIDE THE PRODUCT
See a team take shape.
Watch the current interface with demonstration data. Each recording has playback controls, captions and a written walkthrough.
PRODUCT WALKTHROUGH29 seconds
Create a Team and invite people
Create a Team, confirm its currency, and invite a colleague with the appropriate role.
Read the walkthrough
Start your Team Open Active Team and choose Create Team. Team creation must be enabled for your account.
Name the workspace Use a familiar company or project name. Confirm the currency, which is locked when the Team is created.
Create the Team Your new workspace brings people and desktops together. You can add colleagues next.
Open Members Members shows the people in this Team. Choose Invite member to bring someone in.
Choose a role for the work Enter an email and choose Member or Admin. Review extra permissions only where they are needed.
Send the invitation The invitation remains pending until accepted. This sample invitation is simulated; no email is sent.
PRODUCT WALKTHROUGH33 seconds
Set up a Team desktop
Choose a Team, plan and responsible person, then set separate Windows access before checkout.
Read the walkthrough
Create for your Team Start from Create Teams Jump-Desk. Name the machine and choose the administrator username.
Choose the location Pick an available region suited to where the person using this desktop works.
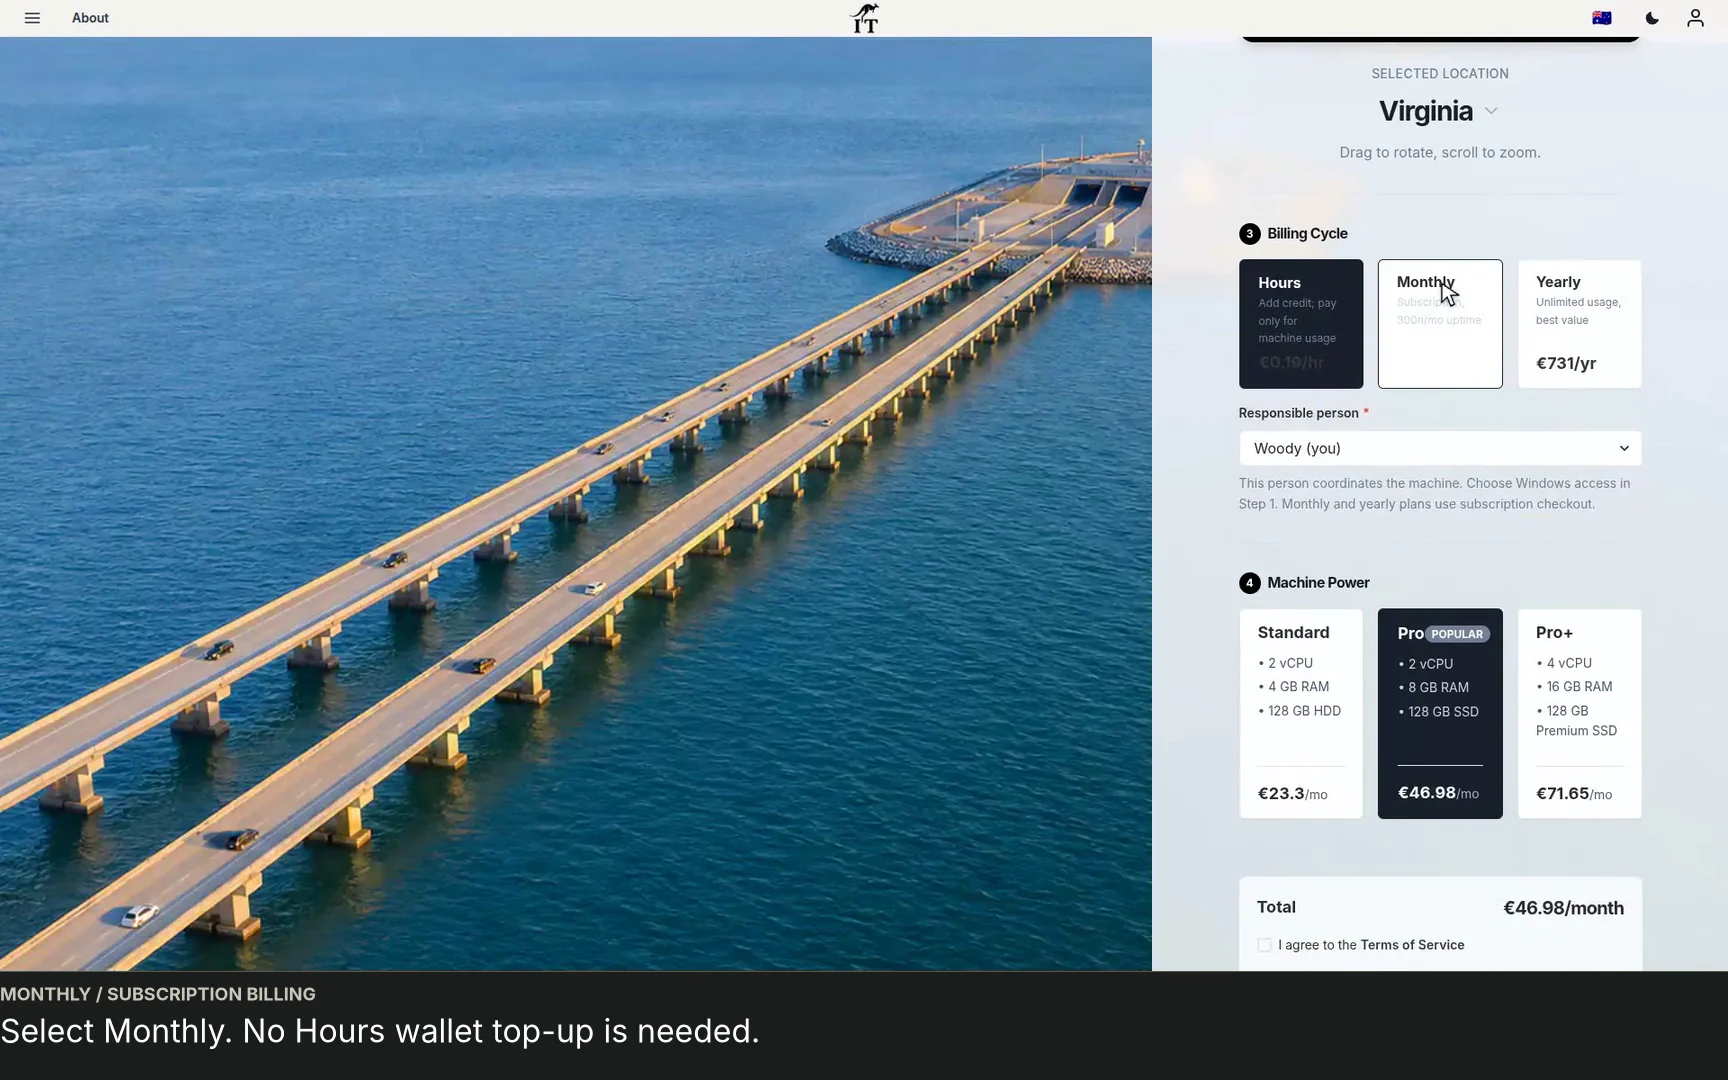
Select a plan This example uses Monthly. Check the price and uptime allowance for the current configuration.
Choose the responsible person Assign responsibility within the Team. Windows access is configured separately below.
Choose who can use Windows Add the person who needs a Windows account. One person can use this desktop at a time.
Review the desktop Choose machine power, check the total and review the terms before checkout. No purchase is made here.
PRODUCT WALKTHROUGH24 seconds
Assign a desktop and connect
Review a Team desktop, change its responsible member, and find the member’s Windows connection.
Read the walkthrough
Open the Team desktops Choose the active Team, then Jump-Desks. Available controls depend on your permissions.
Assign responsibility Choose who coordinates this machine. Assignment and Windows access are separate settings.
Check Windows access Each confirmed member has their own Windows account. Confirm that their access is ready.
Download your own connection Use Connect under My Windows access. The file uses your member account for this desktop.
Continue in your connection app Open the file on your computer, or add the PC in Windows App on iPad with its host details.
A pilot an owner can evaluate.
One role. One real task.
Start with a role the business needs to support. For a contract developer, prepare a Windows desktop with the selected editor, Git, runtime, project repository and test accounts, then rehearse building the application and handing over a code change. For an operations colleague, prepare the licensed business applications and project folders used through the day. Choose capacity and access for that work, and check the actual device and connection.
A budget with the full picture.
Include the desktop plan, retained-desktop service charges on Hours, software subscriptions and the support needed to keep work moving. For prepaid funding, decide who can fund a wallet and review the remaining balance before a busy period. Use the account’s live prices.
An access process that lasts.
Keep the person’s Jump-IT account, Team role and Windows credentials separate. Confirm the member can reach only the controls they need. When a role changes, review Team permissions, Windows access and application accounts together; removing membership alone is not a complete offboarding process.
Choose a desktop for each working pattern.
Months
A subscription for regular work, with up to 300 hours of uptime per desktop each month. Review the allowance and stop desktops when work finishes.
Prepaid Hours
Eligible desktops draw on prepaid funding. Compute is charged while running, plus a separate service charge while retained. Team wallet and eligible member-approved personal funding have separate permissions.
Years
Consider an annual commitment for an ongoing role. Check the live terms, expected software lifespan and likely team changes before choosing.
Desktop management within Jump-Teams. Demonstration data.
Common questions.
Who is Jump-Teams for?
Owners and operators who need to coordinate Windows cloud desktops for a small or medium business, with invitations, assignments and selected shared administration.
Can I delegate administration?
Yes. Choose Admin or Member roles and additional permissions. The Team creator is Owner. Check payment-related permissions separately.
Does joining a Team automatically create Windows access?
No. Team membership and Windows desktop access are separate. Configure and test both during onboarding.
Do monthly desktops use the Hours wallet?
Months uses subscription checkout. Eligible Hours desktops use prepaid funding and have their own funding requirements.
Can everyone share the same Windows login?
Use appropriate separate Windows access. Team membership does not imply shared credentials or simultaneous multi-user Windows licensing.
Make the next working day easier.
Start with a representative role, choose the right desktop and give each person a clear way to begin.
Give AI-assisted work a clear owner and a Windows workspace
Use the GPT-6.1 Terra and Windows execution guide to plan a small development team’s build-and-review process. It separates AI tool permissions, Team management, Windows privileges and the evidence needed before a project is handed over.
Manage cloud Windows work from the new generation of laptops
Plan a contractor’s Windows workspace from setup to handover: Team roles, Windows privileges, project files, application access and monthly cost review.
Watch a first-member onboarding demo: create a Jump-Team, choose permissions, send an invitation and hand over a Windows cloud PC with individual access.
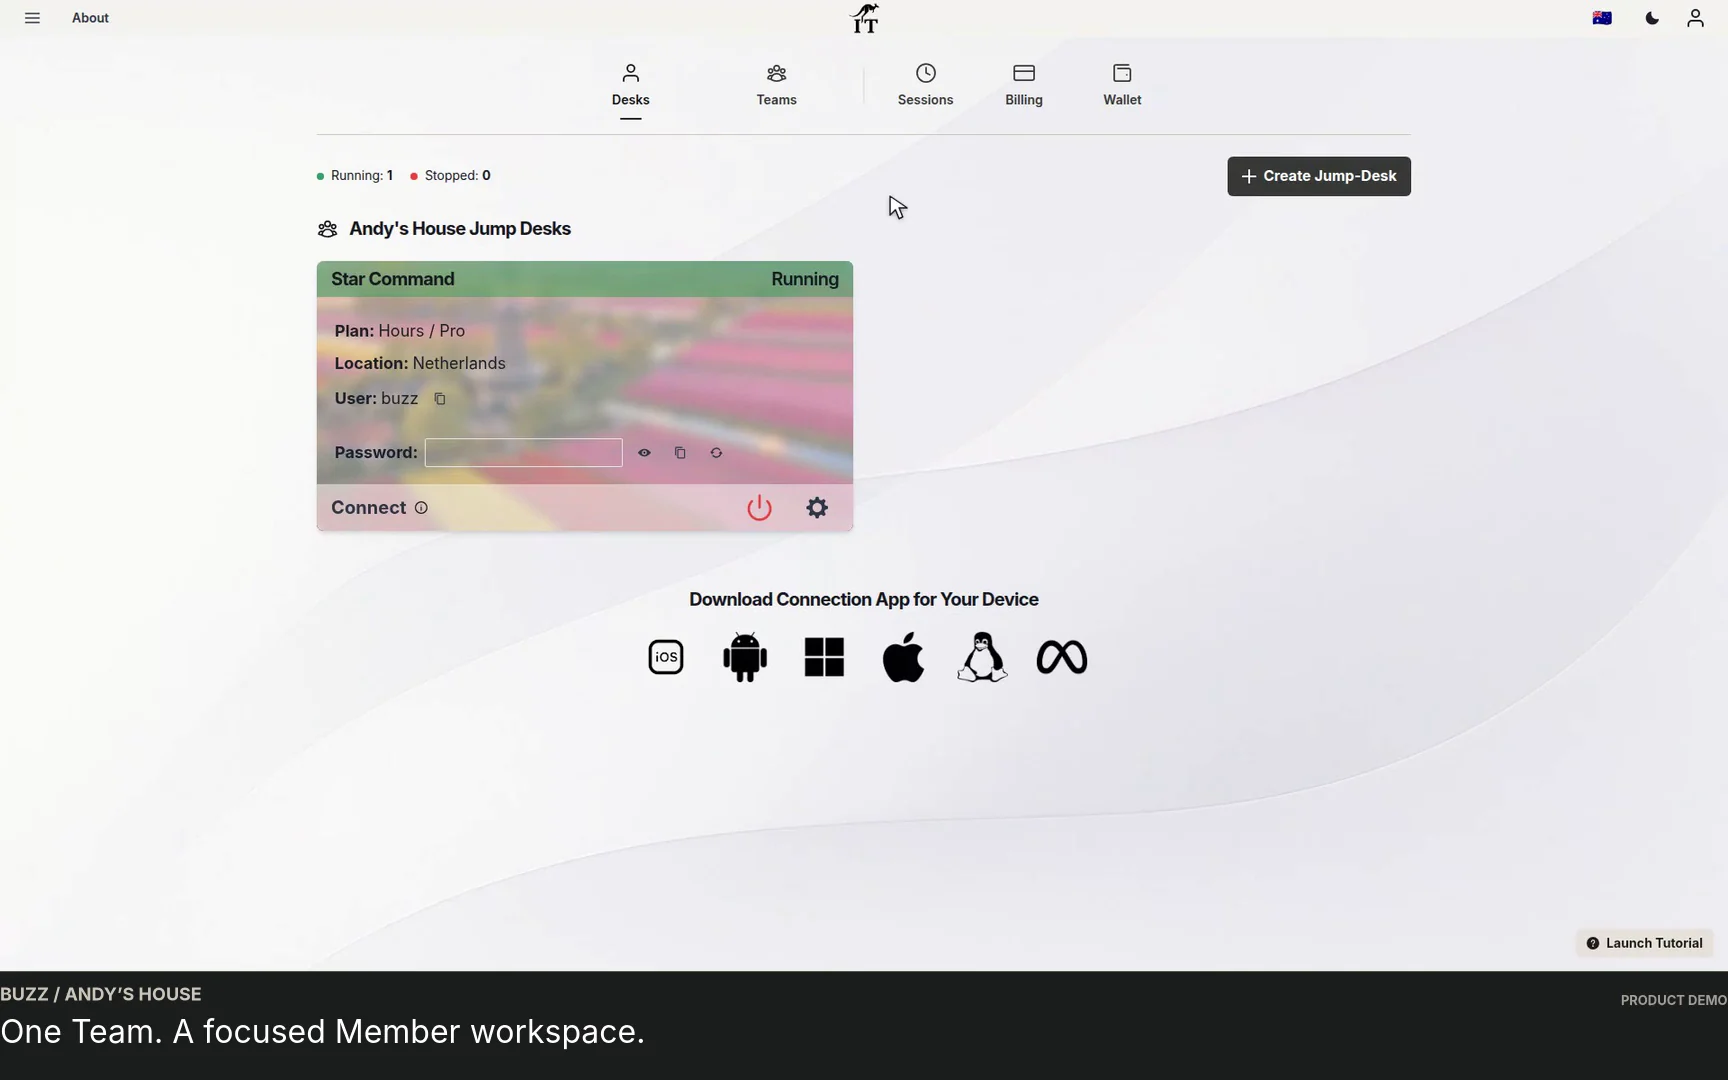
Watch a Team member accept an invitation, find their Jump-Desk, review connection settings and open Windows with their own account and connection file.
Built by a startup, for startups. Give your team Windows cloud PCs on supported devices you already own, with invitations, access controls and flexible funding.